
How to setup Thunder IPTV on Kodi
1. Launch Kodi and select Settings

2. Click Add-ons

3. Choose Install from the repository

4. Click PVR clients

5. Scroll down and choose PVR IPTV Simple Client

6. Click Install
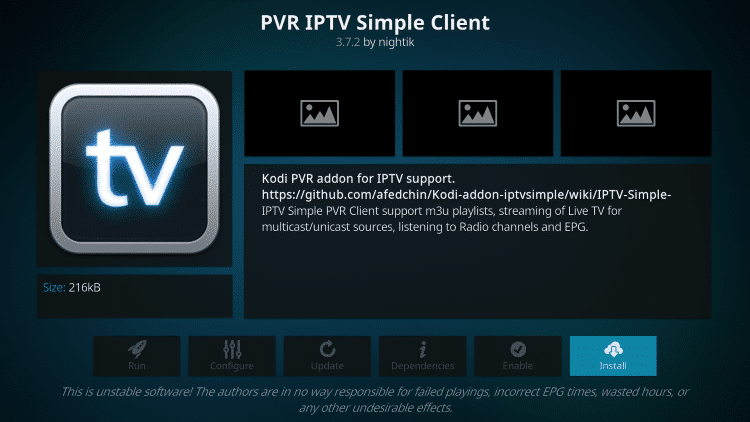
7. Wait for PVR IPTV Simple Client Add-on installed message to appear

8. Click PVR IPTV Simple Client again

9. Click Configure

10. Under General, hover over and select M3U Play List URL

11. Enter provided M3U URL from your IPTV Service with your account info inserted and click OK.
NOTE: You will usually have two M3U URLs. One is for the channel listings and one is for the EPG (TV Guide). We will insert the EPG M3U URL in step #8 below.
Most M3U URLs require that you input your service username and password. You will usually see where these go inside the URL as they are indicated by “username=xxxx” & password=xxxx”. You will input your username and password where the x’s are located.
Here is an example of an M3U URL. This is not a real M3U URL but this is how the structure typically looks:
http://liveiptvservice.org:86/get.php?username=xxxx&password=xxxx&type=m3u_plus&output=ts
Once you have inserted your username and password into the URL, you can use the bit.ly service and shorten the URL so it is easier to type into the box below. That’s what we did.
If you don’t want to use bit.ly you need to ensure that the address is typed into the box with no mistakes. One wrong character in the address and this will not work.

12. Hover over EPG Settings and choose XMLTV URL

13. Type the EPG M3U URL or shortened bit.ly URL for your TV Guide and click OK

14. Click Ok again

15. Click OK when prompted with Needs to restart message

16. Force close Kodi and re-open the app. Wait for PVR Manager to start and channels to download (This may take a few minutes). When finished, you will see Simple Client Channels loaded message

That’s it! Installation is complete.